MendMD OLIS Widget Documentation
Integrate Ontario Laboratory Information System (OLIS) lab results directly into your healthcare applications.
Overview #
The MendMD OLIS Widget is a custom web component that allows healthcare applications to integrate Ontario Laboratory Information System (OLIS) lab results directly into their applications. The widget handles authentication through OneID, data retrieval, and rendering of lab results in a user-friendly interface.
What can you do with the OLIS Widget?
Display patient lab results in your application with minimal development effort. The widget handles authentication, data retrieval, and presentation, allowing you to focus on your core application.
Secure Authentication
Integrated OneID authentication with token management and automatic refresh capabilities.
Modern UI
Clean, responsive interface with visual indicators and intuitive navigation.
Easy Integration
Simple implementation for both web and Electron applications.
Features #
- OneID authentication - Seamless integration with Ontario's healthcare authentication system
- Secure token management - Handles access tokens and refresh tokens automatically
- Infinite scrolling - Load lab results on demand as the user scrolls
- Search functionality - Find specific lab results quickly
- Visual indicators - Critical values are highlighted for quick identification
- Responsive design - Works on desktops, tablets, and mobile devices
- Platform compatibility - Works in both web browsers and Electron desktop applications
Installation #
Getting started with the MendMD OLIS Widget is simple. Follow these steps to add the widget to your application:
Include the widget script
<script src="https://cdn.mend.md/2025.4.1029/widget.js"></script>Prerequisites
Before using the widget, you'll need:
- A MendMD API key (contact sales@mend.md to obtain one)
- OneID integration credentials if you're implementing custom authentication flows
Basic Usage #
The MendMD OLIS Widget can be used in both web applications and Electron-based desktop applications.
Web Applications #
For web applications, simply add the widget element to your HTML and provide the required attributes:
<!-- Basic implementation -->
<mend-olis-widget
    api-key="YOUR_API_KEY"
    hcn="PATIENT_HEALTH_CARD_NUMBER"
    refresh-token="OPTIONAL_REFRESH_TOKEN"
    dob="OPTIONAL_PATIENT_BIRTH_DATE"
    first-name="OPTIONAL_PATIENT_FIRST_NAME"
    last-name="OPTIONAL_PATIENT_LAST_NAME"
    vc="OPTIONAL_PATIENT_HEALTH_CARD_VERSION_CODE"
    gender="OPTIONAL_PATIENT_GENDER">
</mend-olis-widget>
The widget will handle the OneID authentication flow automatically, redirecting the user when needed and processing the authentication callback.
Electron Applications #
For Electron applications, additional setup is required to handle the authentication flow:
// In your main process
const { app, BrowserWindow, session, protocol } = require("electron");
const path = require("path");
const { ipcMain } = require('electron');

let mainWindow;
let authWindow;
let apiKey = null;

app.setAsDefaultProtocolClient("mendwidget");

ipcMain.on("save-api-key", (event, key) => {
    apiKey = key;
});

// Handle OneID authorization
ipcMain.handle("oneid-authorize", async (event, url) => {
    // Open auth window
    authWindow = new BrowserWindow({
        width: 800,
        height: 600,
        parent: mainWindow,       // Make it a child of your main window
        modal: true,              // Keeps it on top of the parent
        alwaysOnTop: true,        // Ensures it's visible above
        center: true,             // Centers it over the parent
        frame: true,
        webPreferences: {
            nodeIntegration: false,
            contextIsolation: true
        }
    });

    if (mainWindow) {
        const [mainX, mainY] = mainWindow.getPosition();
        const [mainWidth, mainHeight] = mainWindow.getSize();
        const authWidth = 800;
        const authHeight = 600;

        authWindow.setBounds({
            x: mainX + (mainWidth - authWidth) / 2,
            y: mainY + (mainHeight - authHeight) / 2,
            width: authWidth,
            height: authHeight
        });
    }

    session.defaultSession.webRequest.onBeforeSendHeaders((details, callback) => {
        details.requestHeaders["X-Api-Key"] = apiKey;
        callback({ requestHeaders: details.requestHeaders });
    });

    authWindow.loadURL(url);

    // Handle redirect
    authWindow.webContents.on("will-navigate", (event, url) => {
        // Handle auth code
        if (url.startsWith("mendwidget://")) {
            handleAuthCallBack(url);
        }
    });

    authWindow.show();
});

// Handle registration
ipcMain.handle("mendmd-register", async (event, url) => {
    // Open auth window
    const registerWindow = new BrowserWindow({
        width: 800,
        height: 600,
        webPreferences: {
            nodeIntegration: false,
            contextIsolation: true
        }
    });

    registerWindow.loadURL(url);

    registerWindow.show();
});


app.whenReady().then(() => {
    mainWindow = new BrowserWindow({
        width: 800,
        height: 600,
        webPreferences: {
            nodeIntegration: true,
            contextIsolation: true,
            preload: path.join(__dirname, "bin", "preload.js")
        }
    });

    mainWindow.loadFile("myrenderfile.html");

    protocol.registerHttpProtocol("mendwidget", (request, callback) => {
        const url = request.url;
        handleAuthCallBack(url);
    });
});


function handleAuthCallBack(url) {
    const hashParams = new URL(url).hash.substring(1);
    const access_token = new URLSearchParams(hashParams).get("access_token");
    const refresh_token = new URLSearchParams(hashParams).get("refresh_token");
    if (refresh_token && mainWindow) {
        mainWindow.webContents.send("refresh_token", refresh_token);
    }
    if (access_token && mainWindow) {
        mainWindow.webContents.send("access_token", access_token);
    }

    authWindow.close();
}
    // Set up token listeners in renderer
    const widget = document.querySelector('mend-olis-widget');
    const apiKey = widget.getAttribute('api-key');
    window.oneIdAuth.sendApiKey(apiKey);

    window.oneIdAuth.onAccessToken((token) => {
    const widget = document.querySelector('mend-olis-widget');
    widget.setAttribute('access-token', token);
    });

    window.oneIdAuth.onRefreshToken((token) => {
    const widget = document.querySelector('mend-olis-widget');
    widget.setAttribute('refresh-token', token);
    });
    const { contextBridge, ipcRenderer } = require("electron");

    contextBridge.exposeInMainWorld("electron", {
        send: (channel) => ipcRenderer.send(channel)
        });

    contextBridge.exposeInMainWorld("mendmd", {
        register: (url) => ipcRenderer.invoke("mendmd-register", url)
        });


    contextBridge.exposeInMainWorld("oneIdAuth", {
        authorize: (url) => ipcRenderer.invoke("oneid-authorize", url),
        getTokens: () => ipcRenderer.invoke("oneid-get-tokens"),
        onAccessToken: (callback) => {
            ipcRenderer.removeAllListeners("access_token"); // Prevent duplicate listeners
            ipcRenderer.on("access_token", (event, token) => {
                callback(token);
            });
        },
        onRefreshToken: (callback) => {
            ipcRenderer.removeAllListeners("refresh_token"); // Prevent duplicate listeners
            ipcRenderer.on("refresh_token", (event, token) => {
            callback(token);
            });
        },
        sendApiKey: (apiKey) => ipcRenderer.send("save-api-key", apiKey),
        on: (channel, func) => ipcRenderer.on(channel, (event, ...args) => func(...args))
    });
Configuration #
The MendMD OLIS Widget can be configured through HTML attributes and JavaScript APIs.
Attributes #
The widget accepts the following attributes:
| Attribute | Description | Required |
|---|---|---|
api-key |
Your MendMD API key | Yes |
hcn |
Patient's Health Card Number | Yes |
refresh-token |
OAuth refresh token for auto-authentication | No |
access-token |
OAuth access token (typically set programmatically) | No |
dob |
Patient's Birth Date (yyyy-mm-dd) | No |
first-name |
Patient's First Name | No |
last-name |
Patient's Last Name | No |
gender |
Patient's Gender (F = Female, M = Male, U = Unspecified/Unknown) | No |
vc |
Patient's Health Card Version Code | No |
Change Patient Programmatically
Once authenticated you can change the patient by setting the hcn attribute:
document.querySelector('mend-olis-widget').setAttribute('hcn', "987654321");
If using the demographic attributes be sure to set them FIRST, the the hcn attribute last to ensure proper demographics are passed.
    document.querySelector('mend-olis-widget').setAttribute('dob', "1998-02-01");
    document.querySelector('mend-olis-widget').setAttribute('first-name', "Kevin");
    document.querySelector('mend-olis-widget').setAttribute('last-name', "Smith");
    document.querySelector('mend-olis-widget').setAttribute('gender', "M");
    document.querySelector('mend-olis-widget').setAttribute('vc', "AB");
    document.querySelector('mend-olis-widget').setAttribute('hcn', "0987654321");
Global Configuration #
You can configure global settings for all widgets:
    import { configureMendWidgets } from 'mend-widgets';

    configureMendWidgets({
        apiBase: 'https://mend.md/', // API base URL
        theme: 'light' // 'light' or 'dark'
    });
Authentication Flow #
The widget uses OneID for authentication with the following flow:
- When a user accesses the widget without valid credentials, they're presented with a login button
- Clicking the login button redirects to OneID authentication
- After successful authentication, OneID redirects back with a code
- The code is exchanged for access and refresh tokens
- The widget uses these tokens to fetch lab results
Authentication Differences
For web applications, the full page redirects to OneID. For Electron apps, a popup window handles the authentication flow.
Refresh Token Handling
The widget automatically attempts to use the refresh token when:
- The widget initializes
- An API call returns a 401/403 status
If refresh token authentication fails, the user will be prompted to log in again.
UI Components and Styling #
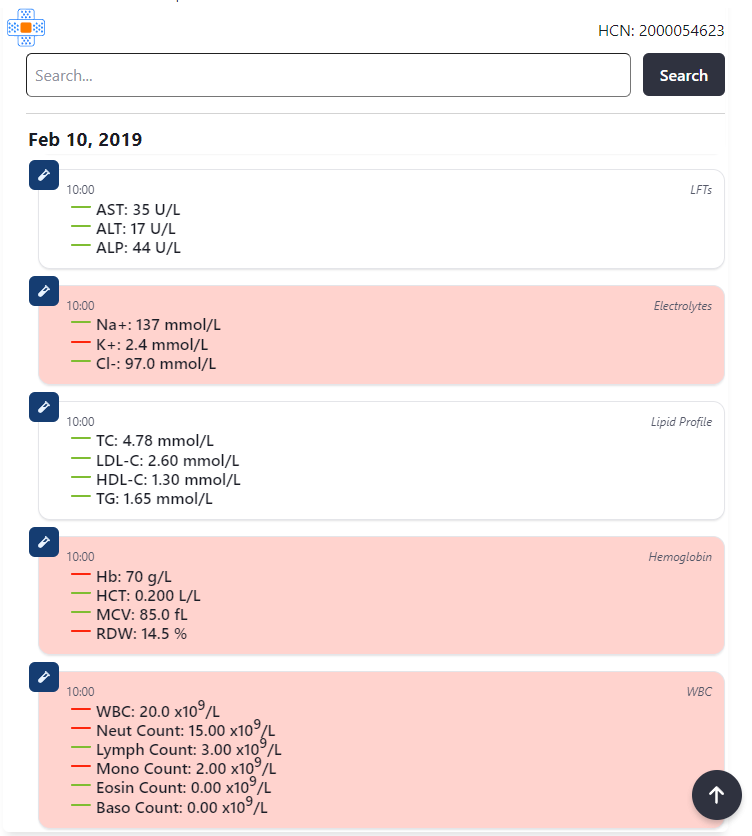
The widget leverages WebAwesome components for its UI. The visual hierarchy includes:
Component Structure
- Results grouped by date
- Each lab result displayed as a card
- Icon indicators for different test types
- Special highlighting for critical values
- Search functionality at the top
- Infinite scrolling for pagination
- "Scroll to top" button when scrolling down
Visual States
Authentication Required: Displays a login button and option to register.
Loading: Shows a loading spinner while retrieving lab results.
Results View: Displays lab results grouped by date with visual indicators.
Search Results: Filtered view of lab results based on search query.
Error State: Displays error message if data retrieval fails.

Browser Support #
The widget uses modern web standards and is compatible with:
Chrome
Latest 2 versions
Firefox
Latest 2 versions
Safari
Latest 2 versions
Edge
Latest 2 versions
Browser Compatibility Note
Internet Explorer is not supported. The widget uses Web Components and modern JavaScript features that require modern browsers.
Security Considerations #
The MendMD OLIS Widget implements several security measures to protect patient data:
Authentication & Authorization
- All API calls require a valid API key and OAuth tokens
- Authentication is handled through secure OneID flows
- Tokens are stored in memory and as attributes
- Token refresh mechanisms handle expiration automatically
Data Protection
- HTTPS is required for production use
- Patient data is only stored in memory, not persisted locally
- Data is only displayed when valid authentication is present
- Shadow DOM isolation helps prevent style and script conflicts
Important Security Note
Consider securing refresh tokens in sensitive applications. The widget stores tokens as attributes which are visible in the DOM. For high-security applications, implement additional token storage mechanisms.
Troubleshooting #
Here are solutions to common issues you might encounter when implementing the MendMD OLIS Widget:
Possible causes:
- Invalid or expired API key
- Invalid or expired refresh token
- Network connectivity issues
Solutions:
- Verify the API key is correct and active
- Check that the refresh token is valid and not expired
- Check network connectivity to MendMD servers
- Review browser console for specific error messages
Possible causes:
- Incorrect HCN (Health Card Number)
- Patient has no lab results in OLIS
- Permissions issue with the API key
Solutions:
- Verify the HCN is correct
- Confirm the patient has lab results in OLIS
- Check API key permissions with MendMD support
Possible causes:
- Incorrect preload script configuration
- Missing IPC handlers
- Content Security Policy issues
Solutions:
- Ensure the proper preload scripts are configured
- Verify IPC handlers are correctly set up
- Adjust Content Security Policy to allow loading the widget
- Check Electron logs for specific error messages
Error Handling
The widget displays user-friendly error messages for common issues:
- Authentication errors
- API connectivity problems
- Missing or invalid parameters
Error loading lab results
Failed to authenticate with the server. Please check your credentials and try again.
Sample Implementation #
Here's a complete example of how to implement the MendMD OLIS Widget in a web application:
    <!DOCTYPE html>
    <html lang="en">
    <head>
    <meta charset="UTF-8">
    <meta name="viewport" content="width=device-width, initial-scale=1.0">
    <title>OLIS Widget Demo</title>
    </head>
    <body>
    <h1>Patient Lab Results</h1>

    <mend-olis-widget
    api-key="YOUR_API_KEY"
    hcn="1234567890">
    </mend-olis-widget>

    <script src="https://cdn.mend.md/2025.4.1029/widget.js"></script>

    <script>
    // Handle the OAuth callback
    window.addEventListener('DOMContentLoaded', () => {
    const urlParams = new URLSearchParams(window.location.search);
    const code = urlParams.get('code');
    const refreshcode = urlParams.get('refreshcode');
    const widget = document.querySelector('mend-olis-widget');
    if (code) {
    widget.setAttribute('access-token', code);
    }
    if (refreshcode){
    widget.setAttribute('refresh-token', refreshcode);
    }

    // Clean up URL
    window.history.replaceState({}, document.title, window.location.pathname);

    });
    </script>
    </body>
    </html>
Version Information #
| Current version | 2025.4.1029 |
|---|---|
| Release date | October 2025 |
| WebAwesome dependency | 3.0.0 |
| Electron dependency | 31.0.0 or higher |
Support #
For technical support or questions about the MendMD OLIS Widget, please contact:
- Email: support@mend.md
- Documentation: https://docs.mend.md/widgets
Ready to get started?
Contact our sales team to obtain API credentials and start integrating the MendMD OLIS Widget into your application.